%20(1000%20×%20700%20px)%20(1000%20×%20650%20px)%20(1000%20×%20670%20px)-700x500w.png)
How to install Engineered Click Flooring?

How to install Engineered Click Flooring?
Here is our 5G Engineered Oak Fitting Instructions:
1. Introduction:
Congratulations with
your new 5G LOC European Engineered Flooring. This product requires a 48 hour
period of acclimatization; stored flat and to remain in the sealed packaging
until the date of installation. It is your responsibility to ensure that your
site conditions are within the stated requirements. This floor should only be
used in dry rooms with normal temperature and air humidity. It should also be
installed as a floating floor on a level and solid wooden or concrete subfloor.
Any old carpets or PVC should be removed. Please ensure that any concrete
subfloor is dry enough before you begin the installation. Use a moisture meter
to check that the moisture content of the subfloor is less than 2%. When this
product is installed with an Underfloor Heating system, be aware that the
moisture conditions are much stricter for this type of installation - 1.8% for
Concrete and 0.5% for Anhydrite. We always advise that you contact your
Underfloor Heating supplier/installer for more details before installation.
2.
Product Grading:
To establish product
consistency; a grading and manufacturing tolerance of 5% has been set to allow
for the de-selection of material if deemed by the customer/installer to be
unsuitable for the installation. A 5% cutting or waste allowance must,
therefore, be taken into consideration and added onto the net square meterage
required for the site. We recommend keeping any spare boards for any subsequent
repairs in years to come. Due to the
quality of our 5G LOC system full plank replacement is possible to do.
Note: Keep a record of
all your moisture readings for later reference and warranty enquiries. We
strongly recommend you keep a record of your moisture and humidity readings
before installation. These measurements will be required by the manufacturer or
supplier if there are any future problems or warranty claims.
3.
General Installation Information:
3A) Preparation -
Tools needed: Distance wedges, hand block, installation support wedge, hand saw
or electric jig-saw, pencil, measuring tape, drill, chisel + hammer, dustpan
and brush.
3B) Check your
Subfloor: Carpets must be removed. You can install our engineered flooring on
all kinds of subfloors if they are dry, flat, fixed and clean, for example on
old wood floors (install at right angles to existing floor), cement/concrete
floors or ceramic tiles. If the subfloor
is of other material, please contact Ukflooringcompany who will be happy to
advise you. The sub floor must be dry: Always measure the moisture content of
cement screed / concrete / anhydrite with professional test instruments and
record readings. Cement screed / Concrete needs a long time dry - in worst
cases up to one year. Requirements, moisture content limits. For concrete sub
floors: max 2% moisture content
Note: All types of
cement screed/concrete/tiles sub floors require a moisture inhibitor - an
ageing resistant PE - plastic film, min. 0,20 mm thick. (sd - value - 100m)
overlapping minimum 15 cm under skirting board and tape all joints overlapping
300 mm. Our wood floors are dried to a moisture content of 8% + /– 2%. Measure
and record.
Note: Subfloor construction boards, for example
particle board/plywood at time of installation may have too high moisture
content (maximum acceptable is 14%). Measure and record all readings. Dry, if
necessary or replace with boards of correct moisture content. In ALL cases
using plywood / particle board an expansion gap of 3 mm should be left ALL round
EVERY board.
Flat: Measure always
with a straight edge. Unevenness of + 2 mm over 2M is unacceptable and should
be levelled.
Tip: Use a suitable
flooring compound to level your sub floor – never use foams or other soft
materials. Always check the floor afterwards for evenness.
Firm and Clean:
Concrete should always be firm and sound, if crumbly, cracked or soft remedial
work is required prior to installation of your Flooring. Always check old
wooden sub floor nail/screw fixings are sound to eliminate the possibility of
unevenness or squeaking. Brush or vacuum clean your sub floor prior to
installing - work clean!
3C) Underlay This type
of Engineered Flooring, when installed using a floating installation, must be
installed over a minimum of 2mm foam or poly underlay (with a density of a
minimum of 180kg/m³). If an acoustic underlay has been installed first and is
suitable according to manufacturer’s guidelines for the flooring to be laid
directly on top, then a 2mm foam or poly-type underlay is NOT necessary.
However, if a 1.5mm cork or bitumen type acoustic barrier is used, then 2mm
foam, in particular, is still recommended to install over the subfloor. The
foam also stops grinding between wood, OSB or plywood sub-floors and should be
used. Moisture inhibitors (such as 1000g Polythene) will only assist in
protecting the floor from residual moisture when the concrete subfloor is 2% or
less. An underlay or moisture inhibitor will NOT cover up an inherent moisture
problem that should have been addressed before installation of your engineered
wood floor.
Sound insulation
material must be installed (over the PE-plastic film, if so required). Use
flooring paper, 2mm cork, HD-foams (over 30 kg/m³) 2-3 mm or other approved
Underlay materials. Always check with your supplier for suitable product
selection.
3D) Underfloor Heating
When installing over Underfloor Heating, we recommend the following guidelines
should be followed;
• Maximum allowed
temperature on top of the floor underneath the floorboards is 29 °C. Please
note, it is not allowed to cover this wooden floor with carpets or rugs if
installed over a floor heating system.
• Always follow the
heating regulation recommendations given by the underfloor heating system
supplier.
4.
Installation Preparation
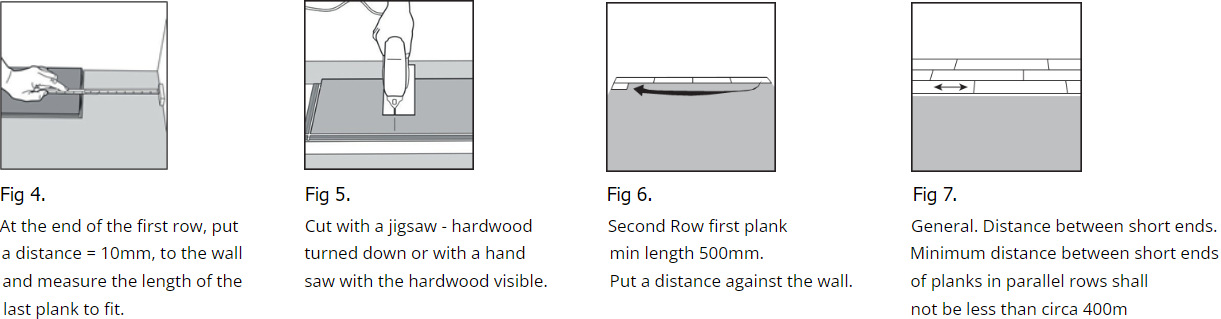
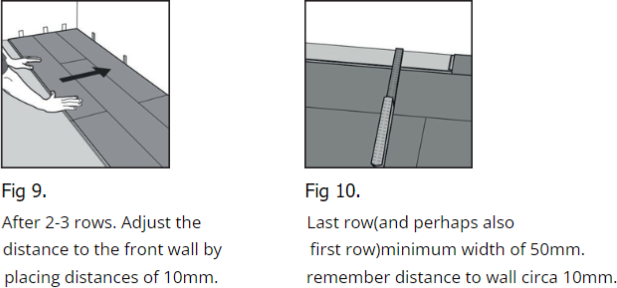
4A) General Measure
the area before installation and decide on the installation direction. It is
recommended to install the board’s end on to the primary source of light. The
width of the last row of boards should not be less than 50mm. If so, adjust the
width of the first board to compensate.
ALWAYS REMEMBER -
MEASURE TWICE & CUT ONCE!
In narrow
hallways/corridors, install the floor parallel to the longest walls. Claims of
visibly defective floorboards must be made before installation. Each board
should be inspected to ensure that the quality is acceptable. No warranty
claims relating to surface defects can be accepted after installation. If you
lay it, you have accepted it.
5.
Installation Method using Valinge 5G
Technology
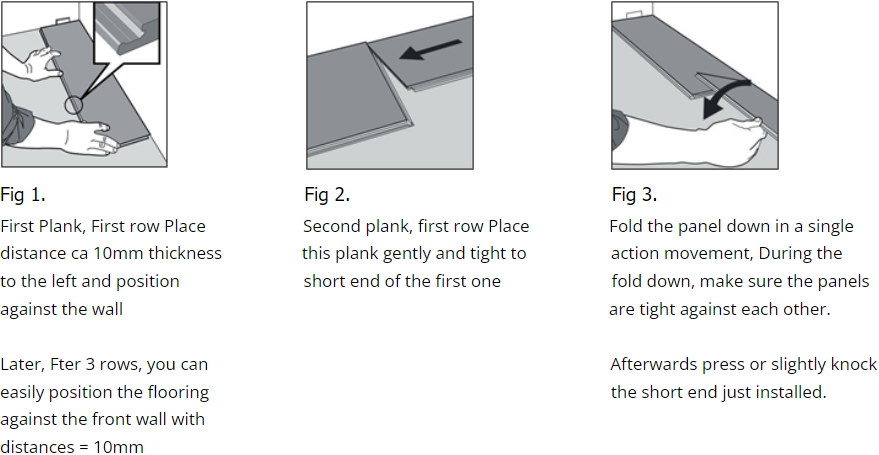
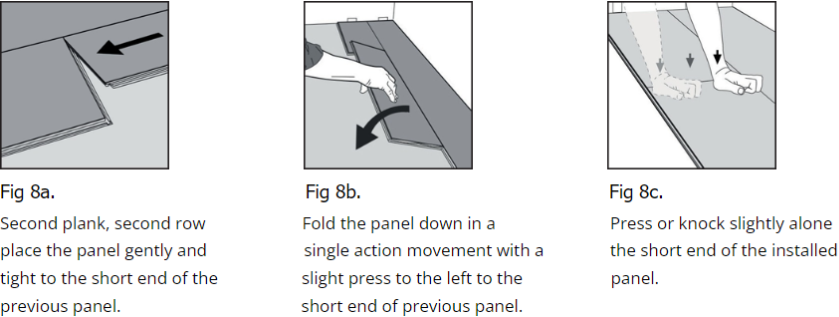
Install the first row as
shown in diagrams below, 2nd and following rows as per method 2: First only connect
board by board as in first row and then angle in the long side of the whole long
row into the 1st row. Tip: Connect this second row on top of the first and then
slowly slide the whole row towards you, till the groove falls in start position.
Angle in by lifting and pushing forward the whole row and fine tune the panel positions
with the positioning block as shown below (fig.6).
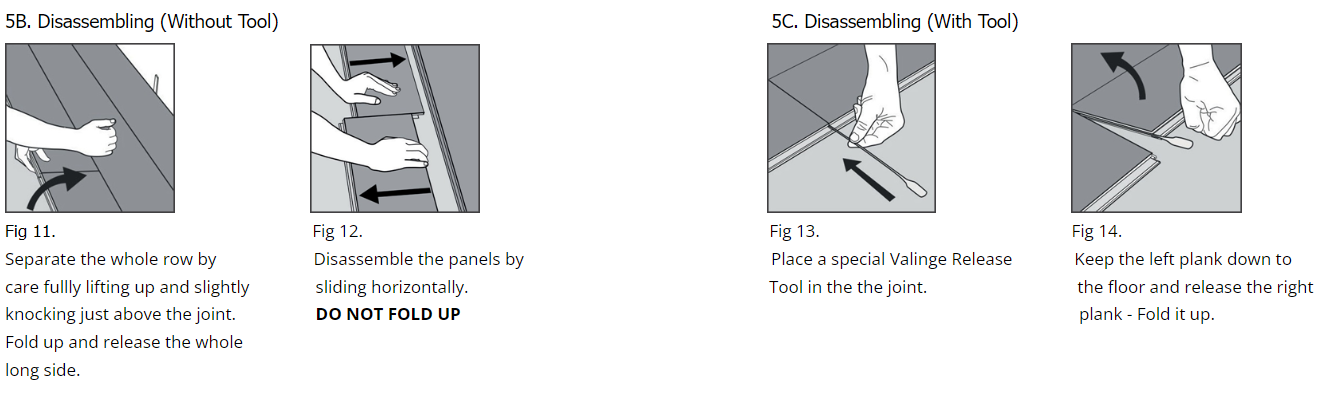
Others: Your floor can
very easily be disassembled, which enables replacement during installation and
also during use. See section F below. You can use the floor immediately after installation.
The skirting’s (moldings) must be fixed to the walls (never to the floor).
Instructions for installing wood floorings with a locking system based on the Vålinge 5G technology.
6.
After the Installation
Once the installation
is complete, the recommended relative humidity (RH) of 45-60 % and temperature
of 18-24°C in the room should be maintained at all times. If necessary, install
a humidifier/dehumidifier to ensure the best climate for yourself, your furniture
and your wood floor. If the environment is not suitably maintained or the floor
is not correctly installed as per these instructions, the floor may show small
gaps or some tension in the floor, which can be heard with footfall.
7.
Cleaning and maintenance
The floor should be cleaned
by using a vacuum cleaner using an attachment for wood floors or brushed using a
soft-bristled brush. If required, wipe with a damp-dry (well squeezed) cloth with
a mild soap. Any liquid accidentally spilt must be wiped off immediately to
prevent staining.
8.
Floor protection
It is recommended practice
to use a good quality doormat at every entrance (both inside and out) to ensure
dirt and dust particles aren't transferred onto the floor surface. For furniture,
soft protective pads should be applied to table and chair legs to avoid any damage
when moving furniture.
9.
Warranty
Your UKflooringcompany
5G LOC European Engineered Flooring warranty last for 20 years starting from the
date of purchase. Please refer to our warranty section at https://www.ukflooringcompany.com for
more detailed information.