How To Install Click Luxury Vinyl Tile (LVT) Flooring? ---A Complete Guide

22 Apr
20 Comment(s)
28458 View(s)
How to install Click Luxury Vinyl Tile (LVT) Flooring? A Complete Guide
In some circumstances, you or your installer may prefer to use a full-spread adhesive, but it's not required. Some collection instructions may also recommend adhesive if expansion due to high sunlight exposure is a risk.
All of our Rigid Core Flooring products feature a "floating floor" structure, meaning that instead of gluing or nailing the boards down, you will lock them together – side to side, end to end – creating a surface that 'floats' atop the subfloor.
Installing your Aquacore Flooring:
Step 1 - Establish Stagger & Align
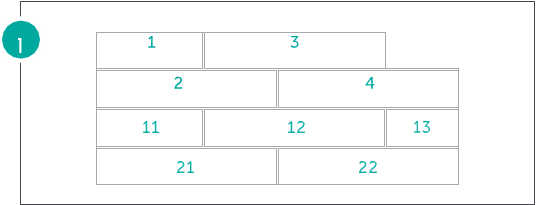
Products should be staggered in bricklaid pattern, stagger equal to half of a plank.
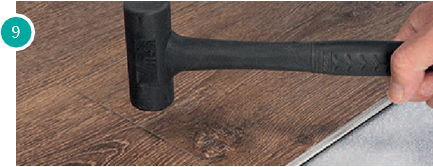
Tools needed: Planks, underlayment, spacers, rubber mallet, cutter.
Step 2 - Prepare Floor
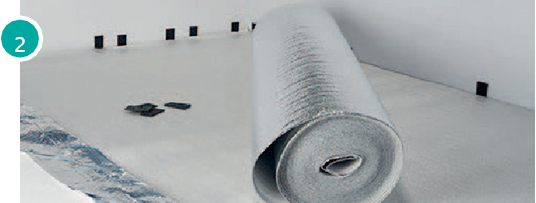
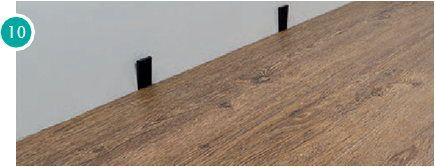
In case of an uneven floor, place underlayment, Set spacers of equal thickness, appropriately disanced, for the required expansion gap.
Step 3 - Install 1st Plank
It is very important that the first row is installed straightly.
To realise this, installation alternates back and forth between rows one and two, for the first two rows only.
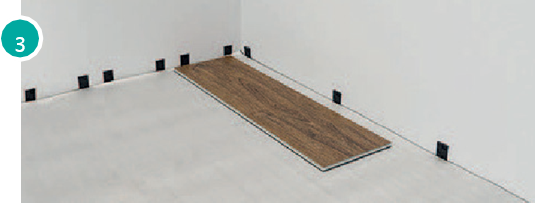
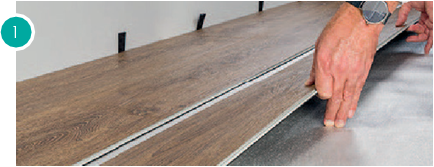
Start with a small plank (1) and posi- tion this plank close to the wall.
Step 4 - Install 2nd Plank
Now select a long plank (2). Using the Click4U angle system, angle the long side of plank 2 on to the long side of plank 1.
Drop plank 2 to lock. Make sure there are no gaps.
Step 5 - Engage 3rd Plank on Long side
Take another long plank (3). Repeating the previous step, insert the long side of plank 3 into the long side of plank 2.
Then slide plank 3 to your left until the short side is in contact with the short side of plank 1.
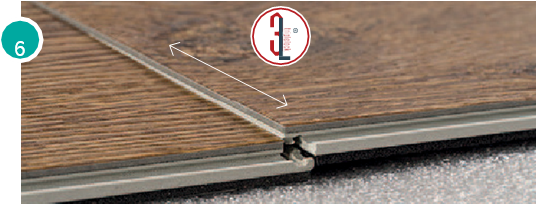
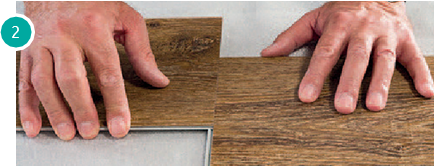
Step 6 - Engage 3rd Plank on Short Side (Part 1)
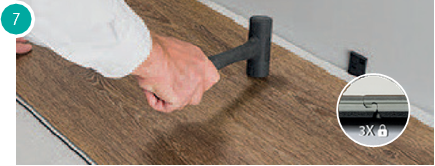
Using the 3L TripleLock one piece drop-lock system, drop the short side of plank 3 onto the short side of plank 1.

%20(1000%20×%20700%20px)%20(1000%20×%20650%20px)%20(1000%20×%20670%20px)-700x500w.png)



155 Comment(s)
This is so a fantastic article. Thanks for sharing this informative blog. I have become a fan of your blogs, and this blog is so exciting and informative.
Such great! & an informative article amazing post and great content. Thanks for sharing this article. Thanks Again!!
This is amazing. Thanks for sharing this blog. I have become a fan of your blogs. This blog is so interesting and informative.
Thanks for sharing this amazing content. Your information is really very outstanding to read.
Your blog is amazing it gives so much ideas and information.
It’s an amazing idea and very helpful for everyone. Thanks for share!
Thank you for this comprehensive guide on installing Click Luxury Vinyl Tile (LVT) Flooring! It's incredibly helpful for DIYers like myself who want to achieve professional results. Looking forward to following these steps for a successful flooring project!
顶尖的英文论文代写 http://www.hotessay.net/our_service1.php 机构会有一个专业、经验丰富的团队,他们拥有在相关领域的学位和经验。会保证文章的原创性,防止抄袭,并提供质量保障。
留学生代写服务通常由经验丰富的专家提供支持,他们具有扎实的学科知识和写作技巧。通过与这些专家合作,留学生可以学到优秀论文的构建方法、论证技巧和语言运用,从而提高自身学术水平。这种学习过程可以帮助留学生更好地理解学科知识,为将来的学习打下坚实基础。
Very Awesome and Help full Article. It really helps me. thanks for sharing this
为什么选择我们的网课代上服务?
1. 专业团队,课程掌握精通
我们的代课团队由各领域的资深学者和教学经验丰富的教育专家组成,确保在各类网课上都能为您提供高质量的代课服务。无论您是修读商科、计算机科学、工程、社会科学或人文学科,我们都能为您匹配最合适的代课专家,确保课程内容的准确掌握和作业的高效完成。
在现代留学生活中,Essay写作已经成为学生们不可避免的学术任务之一。无论是学期中的小型论文,还是期末的高分Essay,写作质量直接影响到学生的学术表现。然而,许多留学生在应对Essay写作时,常常因为语言障碍、学术规范不熟悉、时间紧张或课程难度较高而感到困惑和压力。如果你正面临这些挑战,我们的Essay代写服务将为你提供全面的支持,帮助你轻松应对学术压力,取得理想的成绩。
Vertu's approach to luxury extends beyond the handset to include a suite of exclusive services tailored to the discerning tastes of its clientele. The VertuConcierge service provides round-the-clock assistance, from booking reservations at Michelin-starred restaurants to arranging private jet travel. This level of service is unparalleled, providing Vertu owners with a lifestyle curated with meticulous attention to detail. Vertu's integration of high-tech innovations like Web3 and foldable phones also sets it apart, ensuring that their devices remain at the forefront of technological advancement while still offering the timeless luxury that Vertu owners have come to expect.
Vertu phones offer a range of exclusive services, such as 24-hour personal assistants and global rescue services, which further enhance the prestigious experience of users. Owners of Vertu phones can enjoy customized services and support, which are hard to find in other mobile phone brands. Vertu ensures that its customers can enjoy the top-level treatment and assistance anytime, anywhere through these services.
It’s an amazing idea and very helpful for everyone. Thanks for sharing!
grcias
This particular papers fabulous, and My spouse and i enjoy each of the perform that you have placed into this. I’m sure that you will be making a really useful place. I has been additionally pleased. Good perform!
Seeking a reliable SEO company in Stockholm for SEO optimization, online marketing, website design, Google Ads management, Social Media, USA, UK, Australia, UAE.
We provide support for those looking for 'Take my GED for me' or 'Take my TEAS exam' solutions. Need help with your GED or TEAS exam? We offer services so you can pay someone to take your GED or TEAS exam, hire someone for exam assistance and solutions
Need a job with evening hours? Look into 룸알바 roles.
Leave a Comment